SUMMARY AND BACKGROUND
Customers can purchase a Microsoft 365 subscription direct with GoDaddy along with their primary domain. When this occurs, GoDaddy federates this domain and tenant, making it unable to transfer under the CSP program or Direct to Microsoft. Moving and defederating this account has been a major pain point and area of confusion which this article addresses.
In the solutions proposed in this guide you can perform the following:
- Defederate the tenant without migrating
- Never have to call GoDaddy
- Keep user accounts vs deleting them
- Have no downtime
High-level steps:
- Prepare your End Users
- Become a Tenant Admin in GoDaddy
- Remove Federation with GoDaddy
- Reset Users Passwords
- Add Manage Protect as a CSP Provider
- Provision Licensing into the Account
- Remove GoDaddy as Delegated Admin and Remove Enterprise App
- Cancel GoDaddy Subscription
A. Prepare Your End Users
- Defederating requires users to reset their passwords in order to be able to log in to their account. You will need a password list to distribute to them, or have them provide you passwords beforehand. You could also reset them all to a temporary password after defederation and they can change it afterwards — there is a script later in this article.
- Define a date and time at which you will be defederating. Non-business hours are recommended even though there is no downtime in mail flow with this solution. Provide end users with this information.
- Since users may run into activation prompts within their Office apps and Outlook during the licence transition, provide them documentation for how to sign back in after the licence switch has taken place. For Office apps they can simply go to File > Account > Sign Out > Sign In.
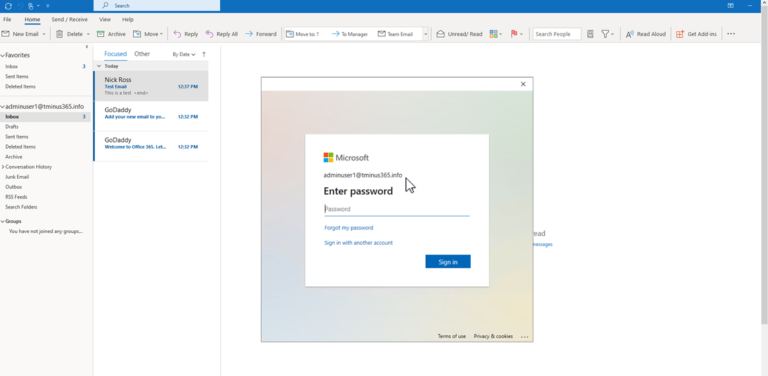
- In Outlook, users will be prompted to re-enter their new password after it is changed:
B. Become a Tenant Admin in GoDaddy
When a user sets up a 365 account directly with GoDaddy, the initial user is set up as an "admin", but this user is redirected to the GoDaddy portal when trying to access the admin tab from Office.com. For this reason, we need to gain access to the true Global Admin so that we can run the necessary PowerShell scripts to defederate the tenant.
- Log in to portal.azure.com with the admin user that was set up when the account was first created and click on the 3 lines in the top left corner.
- Click on Azure Active Directory, then click on Users when the new tabs open up.
- Here you should see a user labelled admin@<randomname>.onmicrosoft.com. Ex:

Click on this user and reset their password. If you already have access to this user, you can disregard this step.
Once you have copied the temporary password, place it in a notepad and open an incognito window in the browser. Go to office.com and sign in with that username and temporary password, then establish a new password. With this completed, you now have a user that can run the necessary PowerShell commands in the future steps.
C. Remove Federation with GoDaddy
We can use the following PowerShell cmdlets to defederate the tenant. Note that you need to run PowerShell as administrator.
$Module = Get-Module -Name "Microsoft.Graph.Identity.DirectoryManagement" -ListAvailable
if ($Module -eq $null) {
Write-Host "MSGraph module not found, installing MSGraph"
Install-Module -Name Microsoft.Graph.Identity.DirectoryManagement
}
Connect-MgGraph -Scopes "Directory.Read.All","Domain.Read.All","Domain.ReadWrite.All","Directory.AccessAsUser.All"
# Enter the Admin credentials from "Become a Tenant Admin in GoDaddy"
Get-MgDomain
# See that the domain is "Federated"
Update-MgDomain -DomainId "<InsertFederatedDomain>" -Authentication Managed
An example of a DomainId is "company23.com". This would be the domain listed as federated that you want to convert to managed. After this is complete you will get a new command line. You can run Get-MgDomain again and see that your domain is now "Managed".
Supporting cmdlet docs:
- Get Started: Get started with the Microsoft Graph PowerShell SDK | Microsoft Learn
- Get Domain: Get-MgDomain | Microsoft Learn
- Update Domain: Update-MgDomain | Microsoft Learn
D. Reset Users Passwords
You can do this manually one user at a time if there aren't many users in the account, or you can use a PowerShell script to bulk update everyone's passwords from a CSV file. If you plan to do them manually, simply log in to office.com as the admin derived from section B — now that the tenant is defederated you will be able to click into the admin tile and access the Users section as normal. Otherwise, connect to PowerShell as administrator and run one of the scripts below.
Single User Update
Import-Module Microsoft.Graph.Users -ErrorAction Stop
Import-Module Microsoft.Graph.Authentication -ErrorAction Stop
# --- Connect to Graph ---
Write-Host "Connecting to Microsoft Graph..." -ForegroundColor Cyan
Connect-MgGraph -Scopes "User.ReadWrite.All"
$passwordProfile = @{
Password = '<InsertPassword>'
ForceChangePasswordNextSignIn = $true # optional
}
Update-MgUser -UserId 'example@domain.com' -PasswordProfile $passwordProfile
Multi-User Update
CSV format — make a CSV like this:
alice@contoso.com,P@ssw0rd123!
bob@contoso.com,Secur3Pwd!
charlie@contoso.com,Hada9200!
- UserPrincipalName – UPN / sign-in name of the user
- NewPassword – the new password you want to assign
Script
.SYNOPSIS
Bulk reset user passwords in Entra ID using Microsoft Graph.
.DESCRIPTION
Imports a CSV of users and sets each account's passwordProfile.Password.
Requires: Microsoft.Graph module and User.ReadWrite.All (or Directory.AccessAsUser.All).
.PARAMETER CsvPath
Path to the CSV file containing UserPrincipalName and NewPassword columns.
#>
param(
[Parameter(Mandatory = $true)]
[string]$CsvPath
)
# --- Load Graph modules ---
Import-Module Microsoft.Graph.Users -ErrorAction Stop
Import-Module Microsoft.Graph.Authentication -ErrorAction Stop
# --- Connect to Graph ---
Write-Host "Connecting to Microsoft Graph..." -ForegroundColor Cyan
Connect-MgGraph -Scopes "User.ReadWrite.All"
# --- Import CSV ---
if (-not (Test-Path $CsvPath)) {
throw "CSV file not found at path: $CsvPath"
}
$users = Import-Csv -Path $CsvPath
if (-not $users) {
throw "CSV file '$CsvPath' contains no rows."
}
Write-Host "Processing $($users.Count) users from CSV..." -ForegroundColor Cyan
$results = @()
foreach ($user in $users) {
$upn = $user.UserPrincipalName
$newPassword = $user.NewPassword
if ([string]::IsNullOrWhiteSpace($upn) -or [string]::IsNullOrWhiteSpace($newPassword)) {
Write-Warning "Skipping row with missing UserPrincipalName or NewPassword."
continue
}
$passwordProfile = @{
Password = $newPassword
ForceChangePasswordNextSignIn = $true # set to $false if you don't want this
}
try {
Write-Host "Updating password for $upn ..." -ForegroundColor Yellow
Update-MgUser -UserId $upn -PasswordProfile $passwordProfile
$results += [pscustomobject]@{ UserPrincipalName = $upn; Status = "Success"; Error = $null }
}
catch {
Write-Warning "Failed to update password for $upn : $($_.Exception.Message)"
$results += [pscustomobject]@{ UserPrincipalName = $upn; Status = "Failed"; Error = $_.Exception.Message }
}
}
# --- Output summary ---
Write-Host ""
Write-Host "Bulk password reset completed." -ForegroundColor Green
$results | Format-Table -AutoSize
# Optionally export results to CSV:
# $results | Export-Csv -Path ".\PasswordResetResults.csv" -NoTypeInformation
Leveraging the Admin Portal
If you do not want to use PowerShell, you can reset users' passwords one by one in the Entra Admin Center > Users > Select User > Reset Password.
E & F. Add Manage Protect as CSP Provider and Provision Licensing
Now that the tenant is defederated, you can add a Manage Protect as the CSP provider with our delegated admin link, Support will provide this to connect up the customer, please reach out to support@manageprotect.com to connect up your existing tenancy.
For CSP:
Paste the appropriate link in a browser and sign into the tenant with the Global Admin credentials if you are not already logged in. Accept the reseller relationship from Manage Protect (Rhipe). After acceptance, reload the page and you will see a new CSP listed.
Order licensing for this customer. If you are not changing the subscription, all you need to do is provision the same number of seats as you have today, remove GoDaddy as delegated admin, and cancel with GoDaddy. Licence ownership will transfer and there will be no downtime for users.
If you are changing the subscriptions assigned to users (e.g. moving them from Business Standard to Business Premium), perform the following steps:
- Order the licensing from Manage Protect.
- See the licensing provisioned in the 365 tenant for this customer under Billing > Your Products.
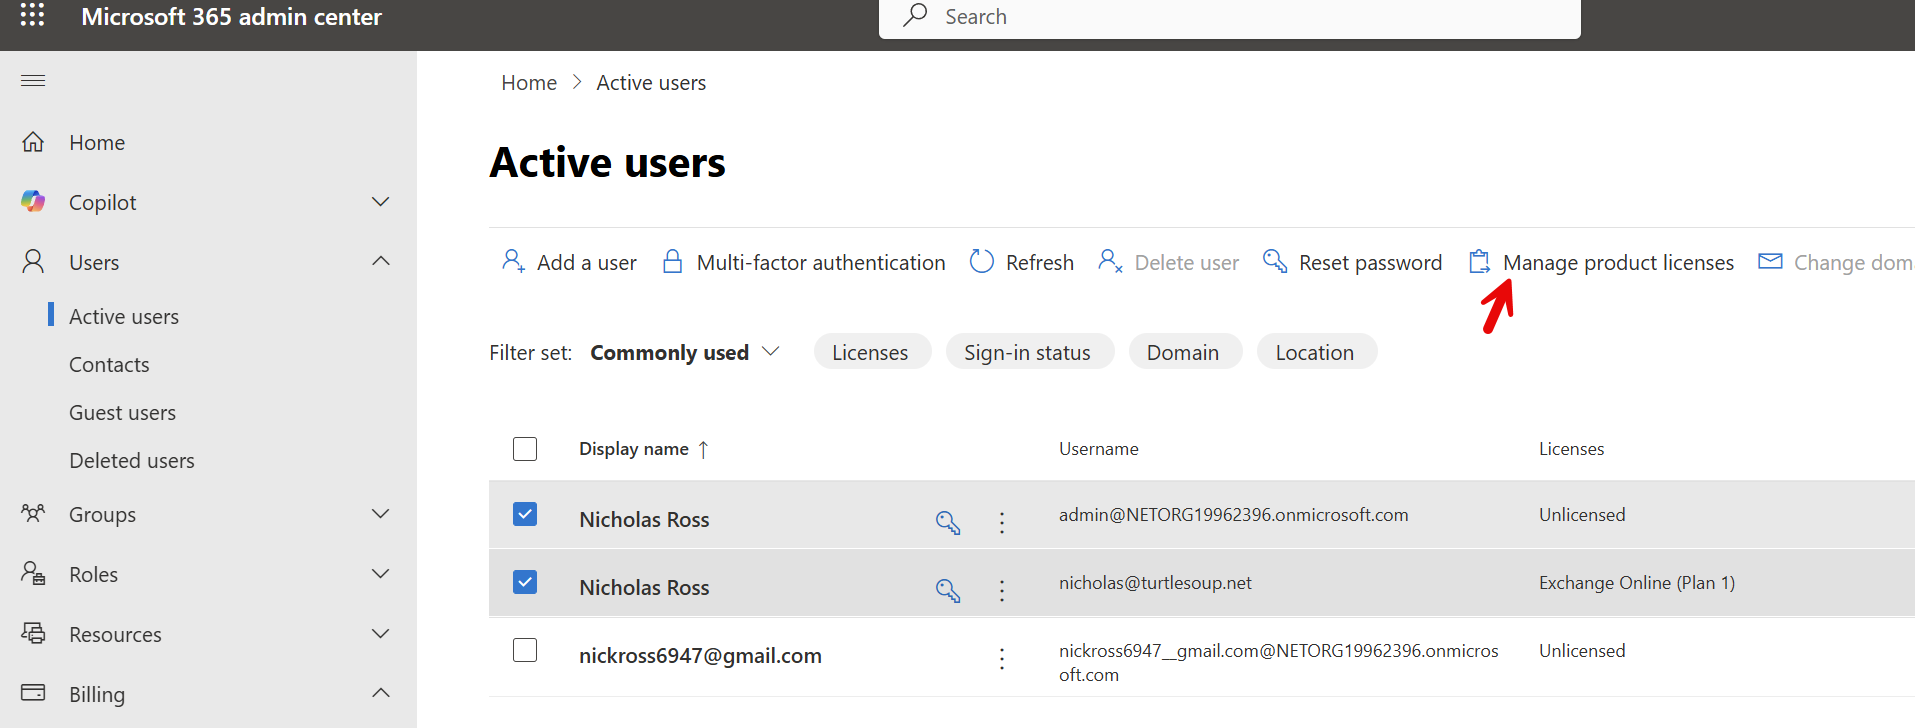
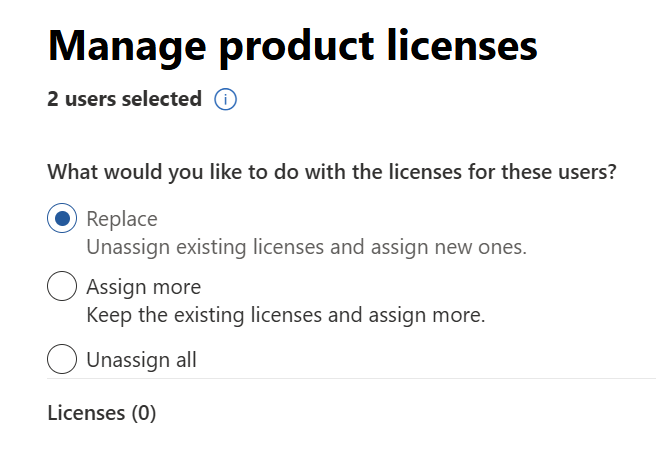
- Go to Users > Active Users and bulk assign the new licensing and unassign the licensing from GoDaddy.
Email Security (i.e. Proofpoint Considerations)
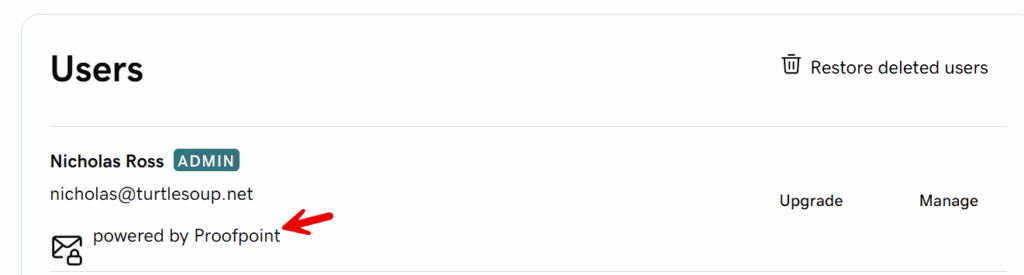
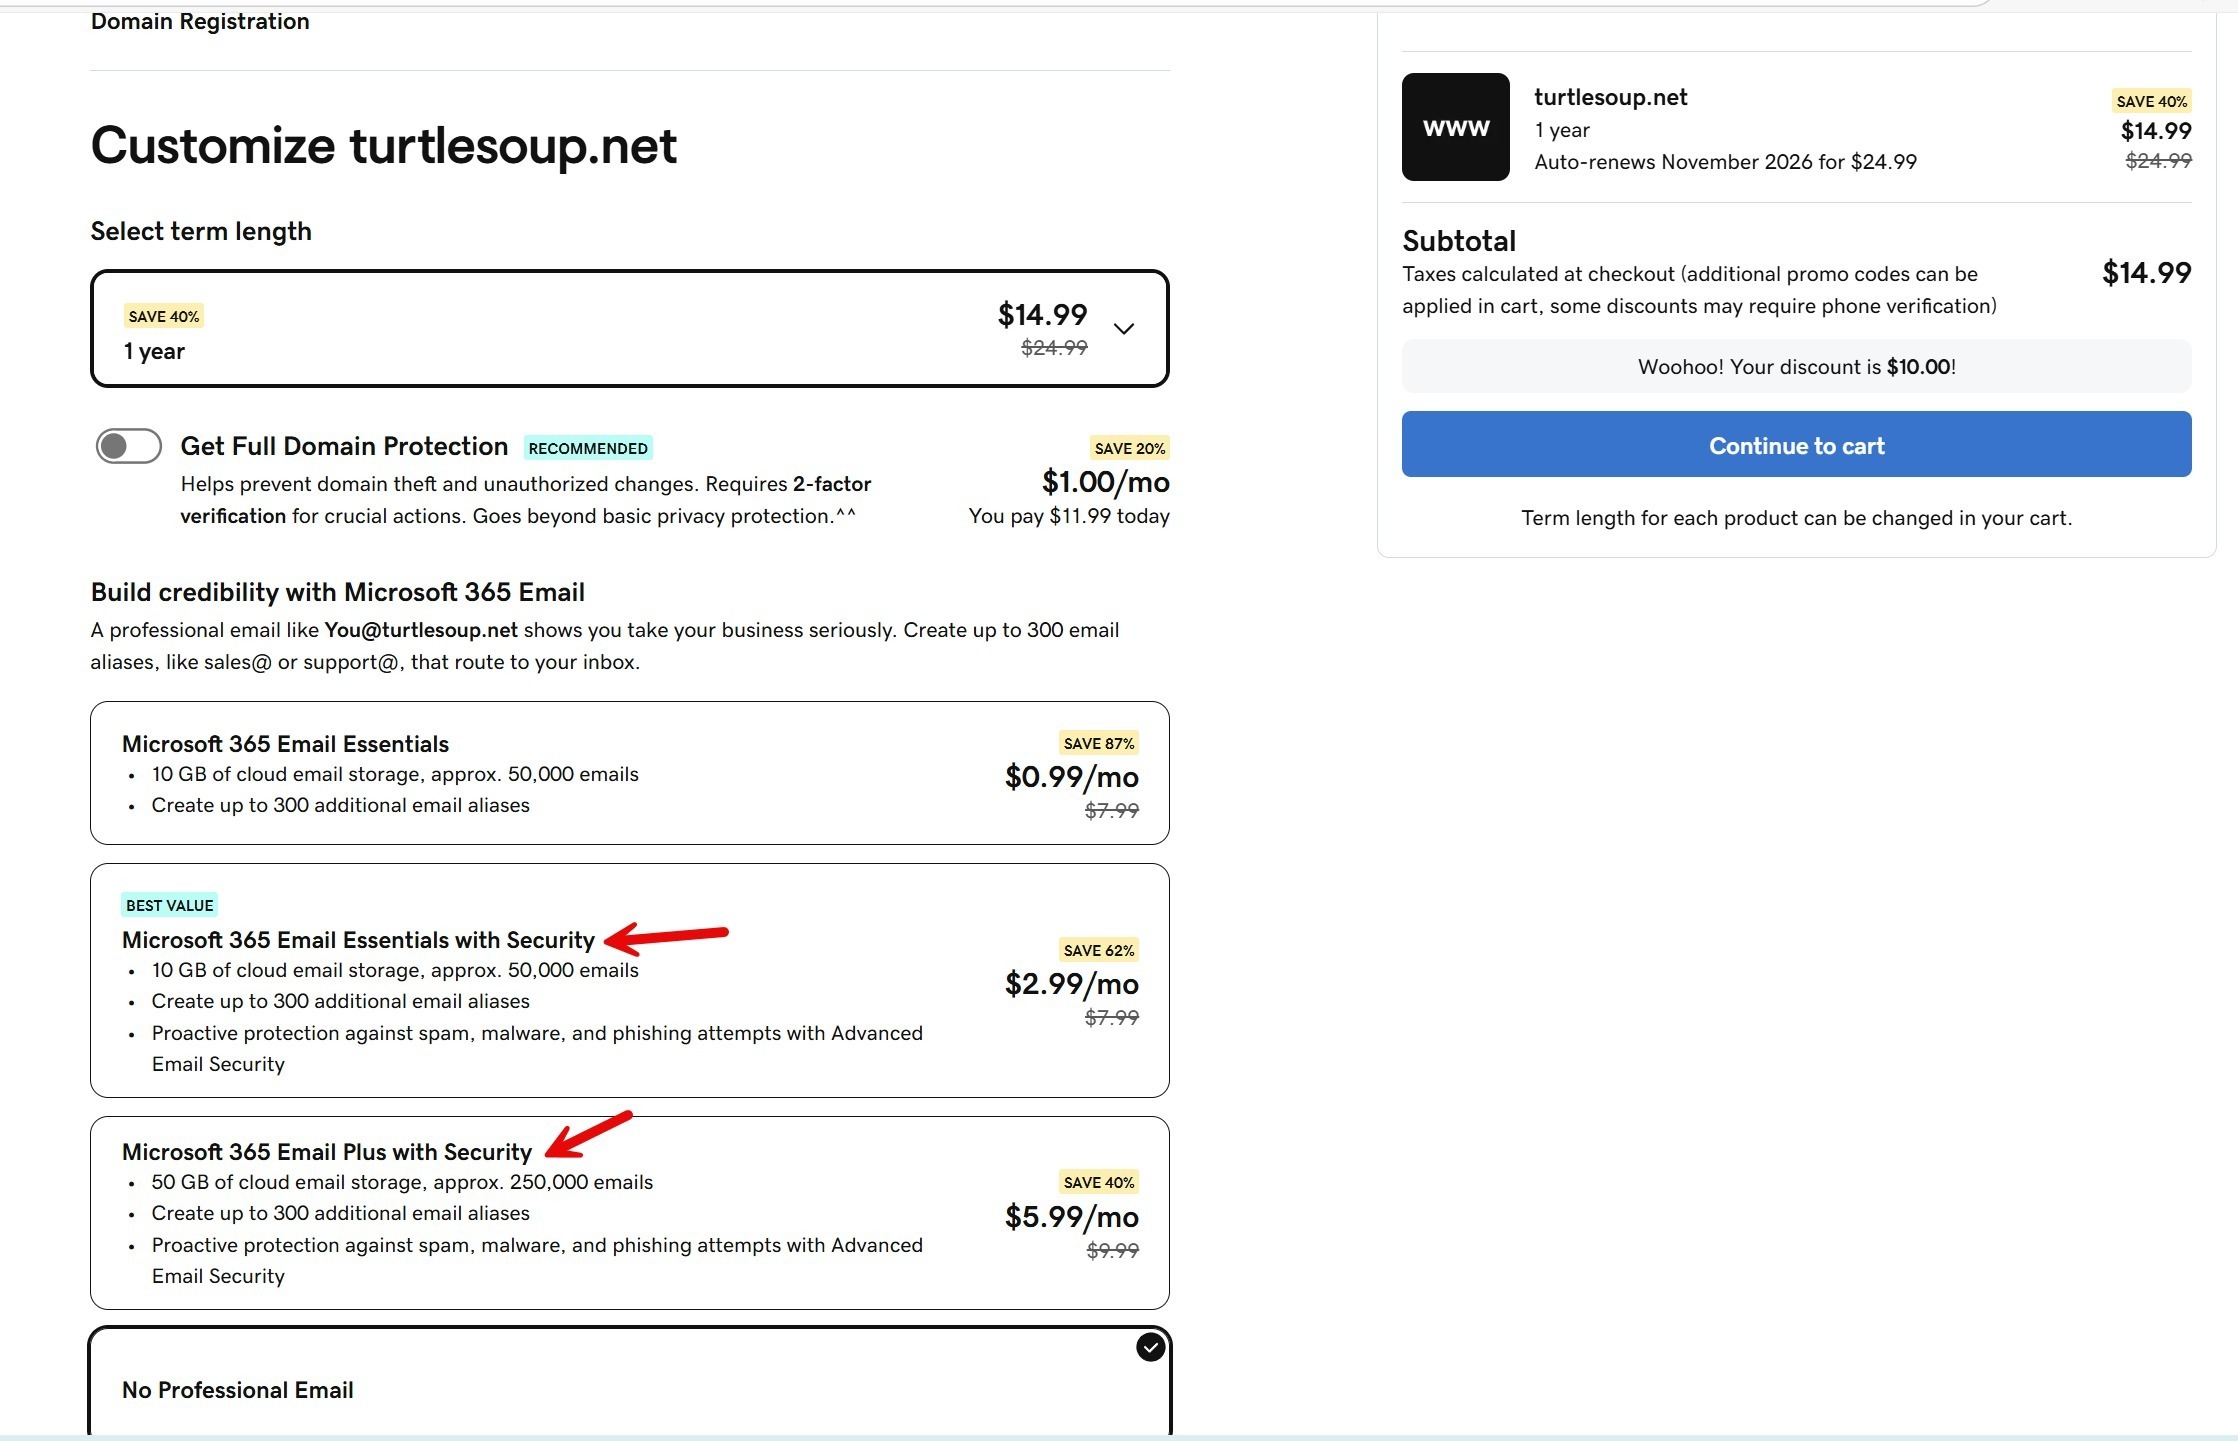
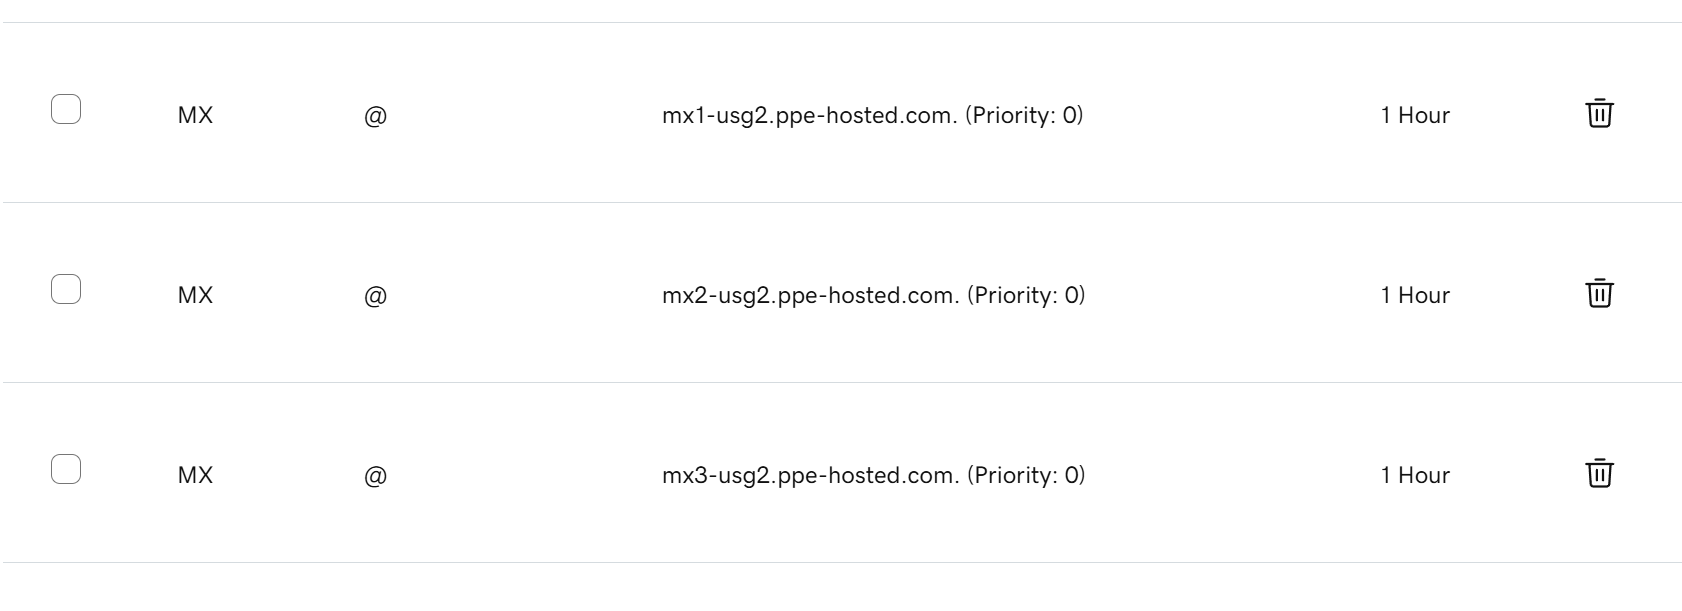
If you have a plan with GoDaddy that includes email security, they layer in Proofpoint. Proofpoint redirects mail flow to their portal via the MX record. If you have this plan and do not change MX records after cancellation, EMAIL WILL GO DOWN. Note that if you do not have one of these plans you do NOT have to follow these steps.
Where to check:
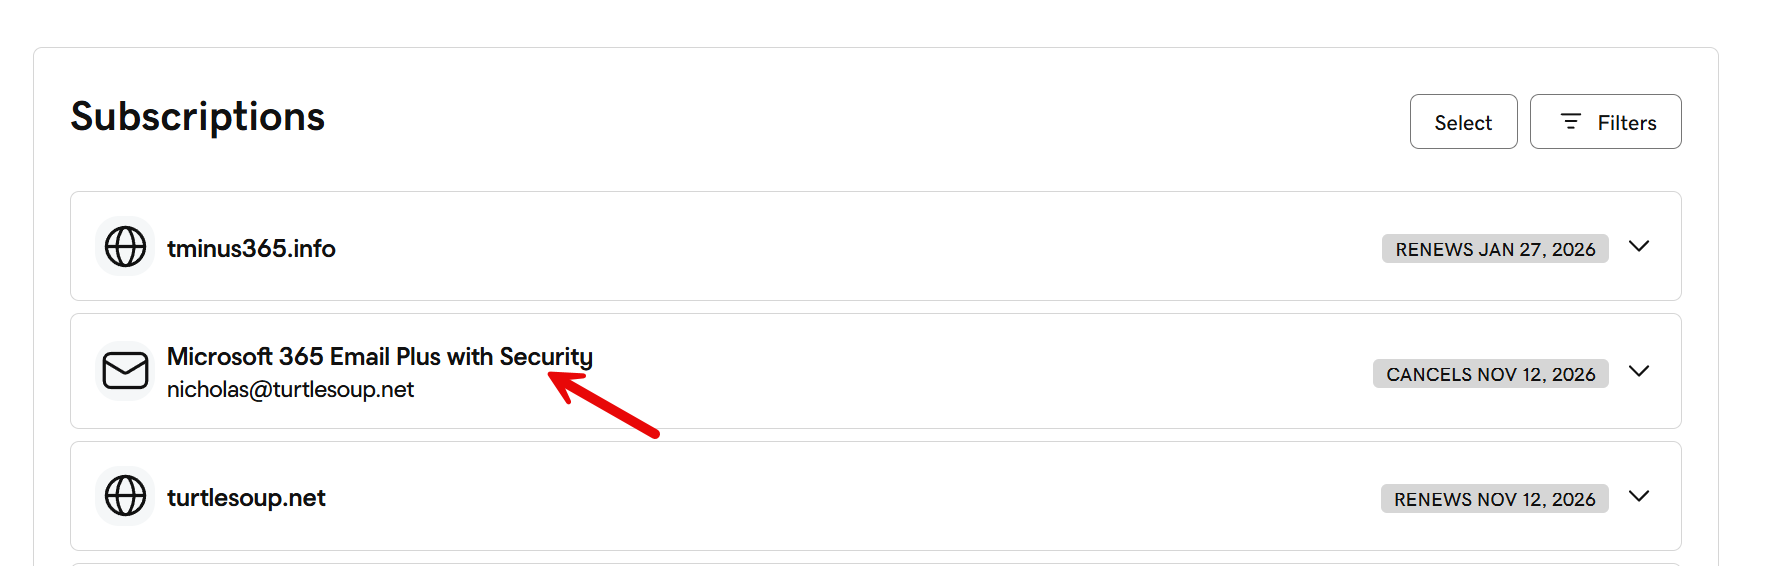
- Go to My Account | Billing in GoDaddy.
- Look for a subscription that has email + security. Examples:
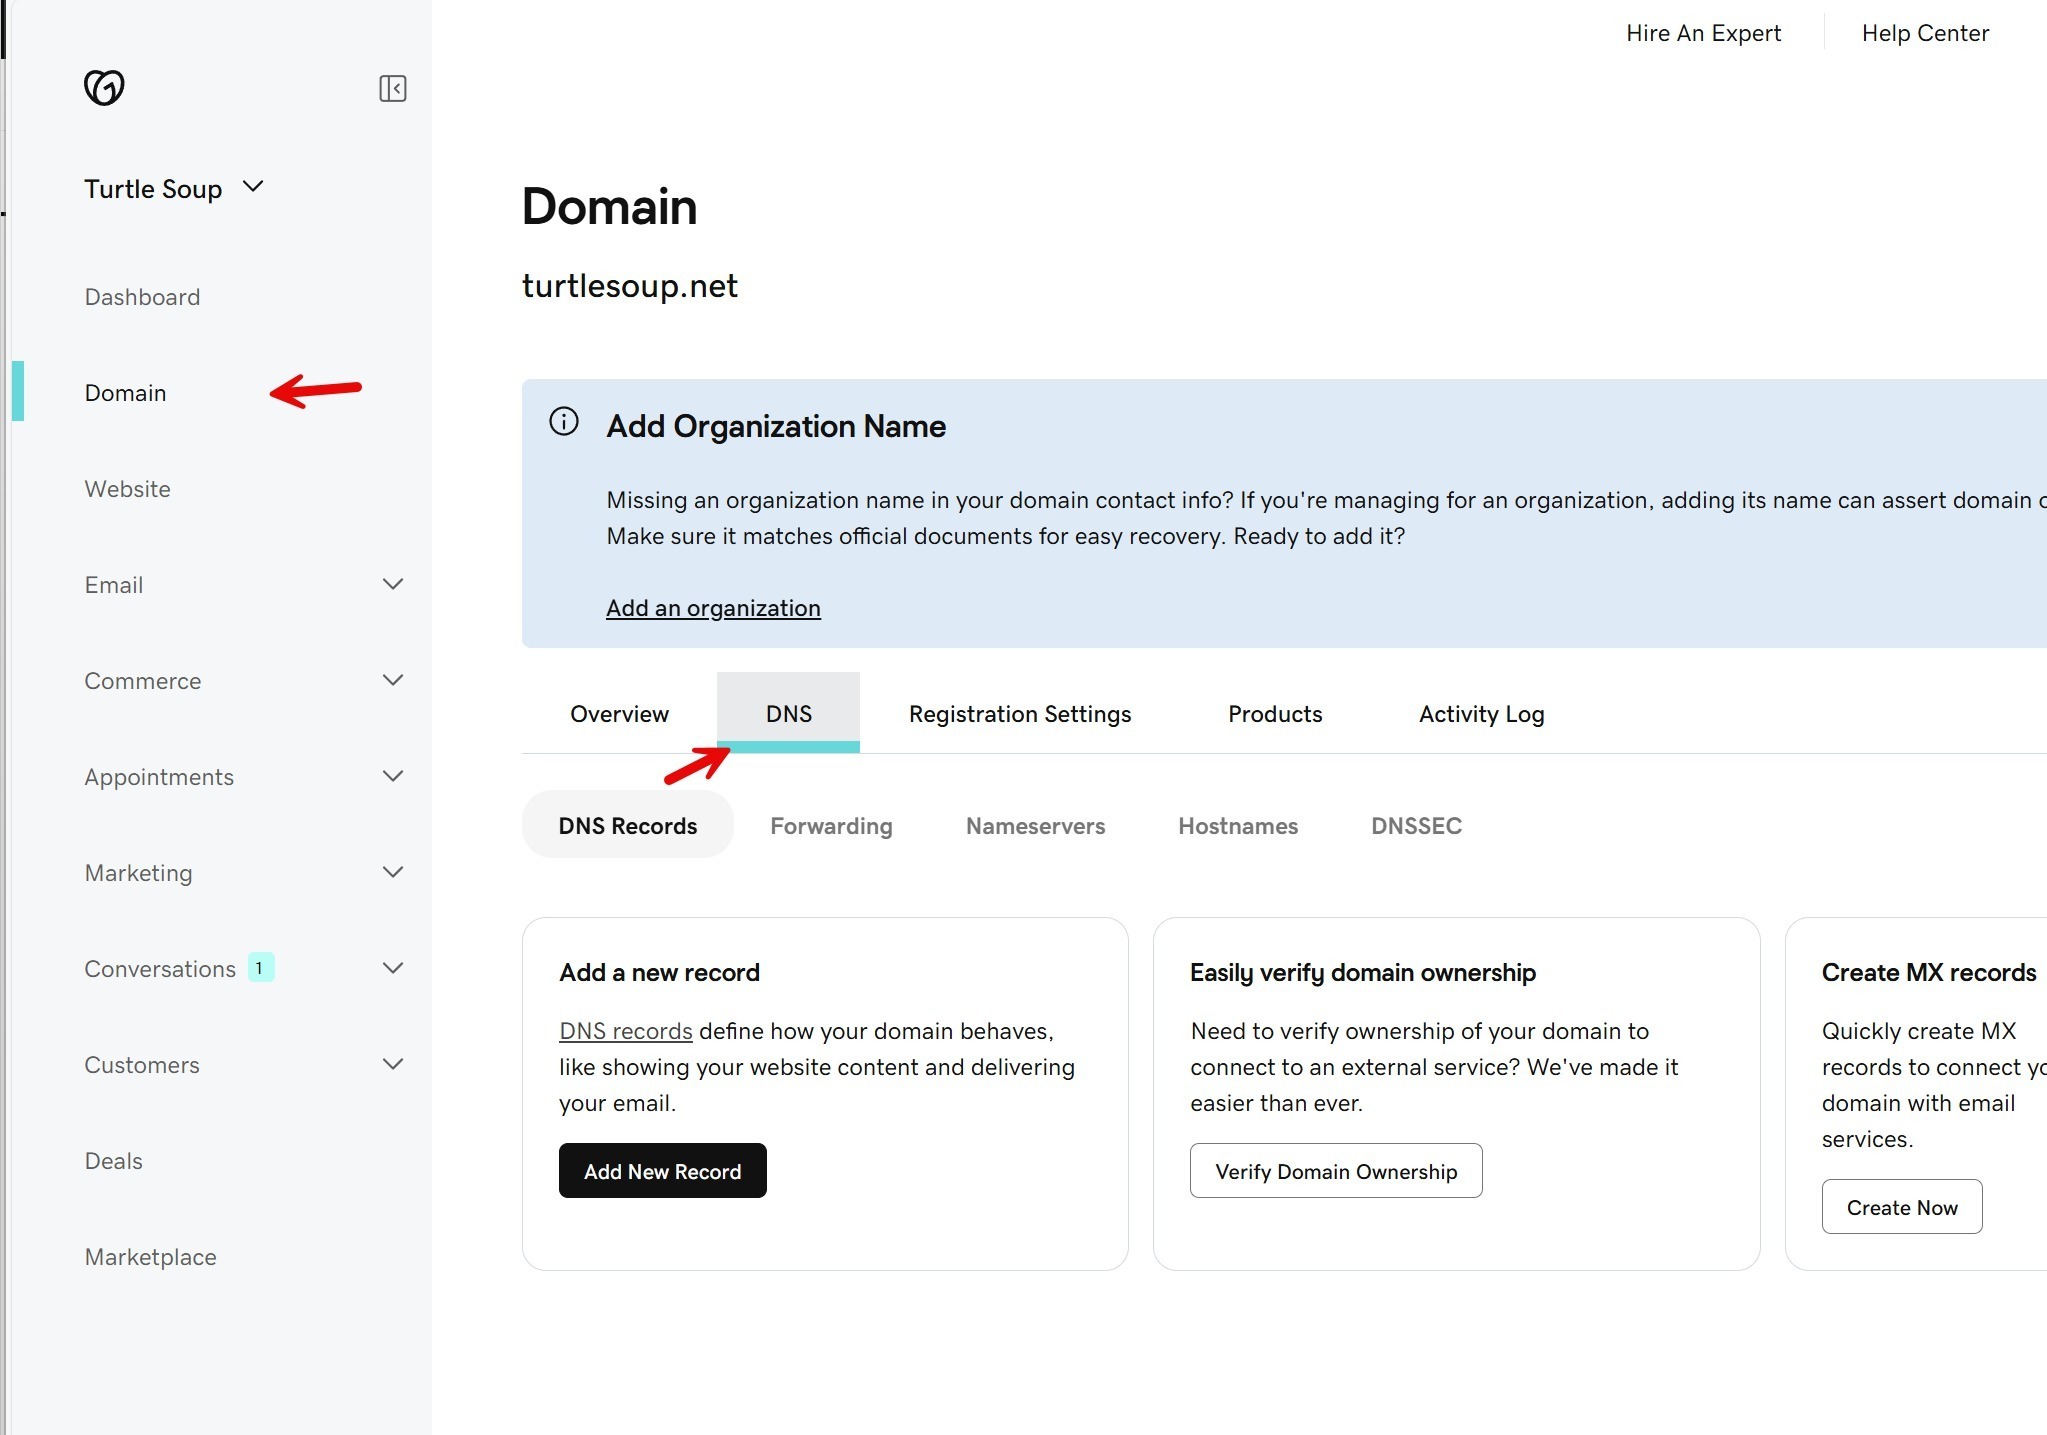
Updating your DNS records:
The Domain section of GoDaddy will host all of your DNS records. Ex:
Here you will find the MX records for Proofpoint:
From here you have two options:
- Manually update the records in GoDaddy.
- Use the "Add DNS Records for me" functionality in the Microsoft Admin Portal.
In either case, head over to the admin portal for the tenant: https://admin.cloud.microsoft/#/Domains
From here you can find the MX record to update in GoDaddy. Ex:
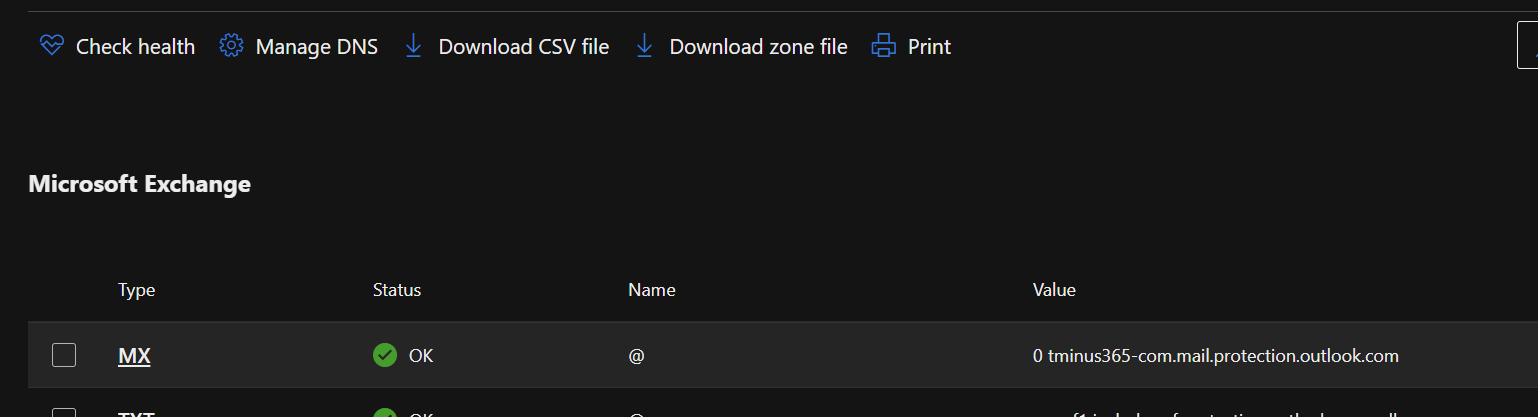
You can update the existing MX record in GoDaddy and delete the other two.
G. Remove GoDaddy as Delegated Admin
In the 365 Admin Portal, go to Settings > Partner Relationships > click on GoDaddy > Roles > remove their roles:
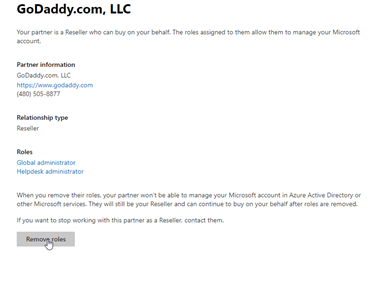
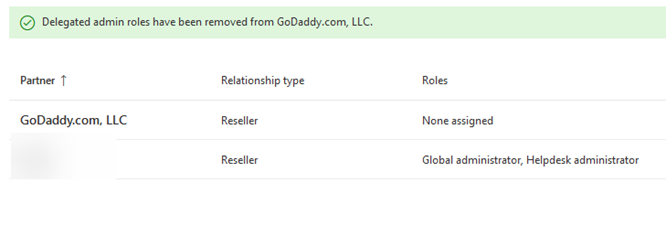
Remove Enterprise App (NEW as of Nov 2025)
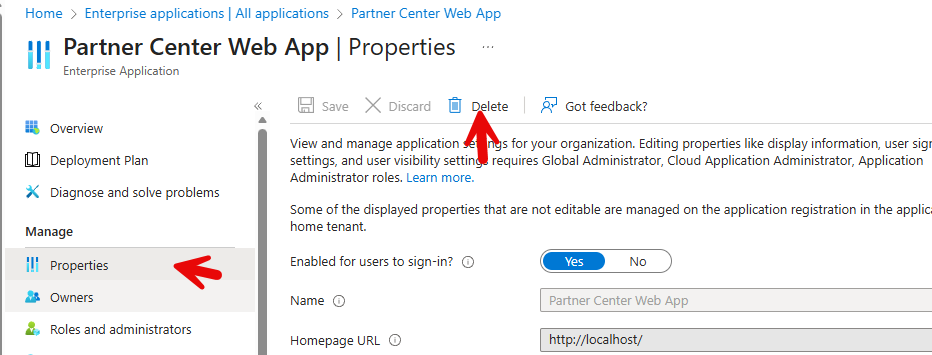
GoDaddy also has an Enterprise app that they could leverage to perform write activity even after GDAP is removed. This is done from an Enterprise App called "Partner Center Web App". You need to delete this from the Enterprise apps section in Entra.
Go to https://entra.microsoft.com/ as an admin.
Go to Enterprise apps and click on the X on the existing filter for Enterprise Applications.
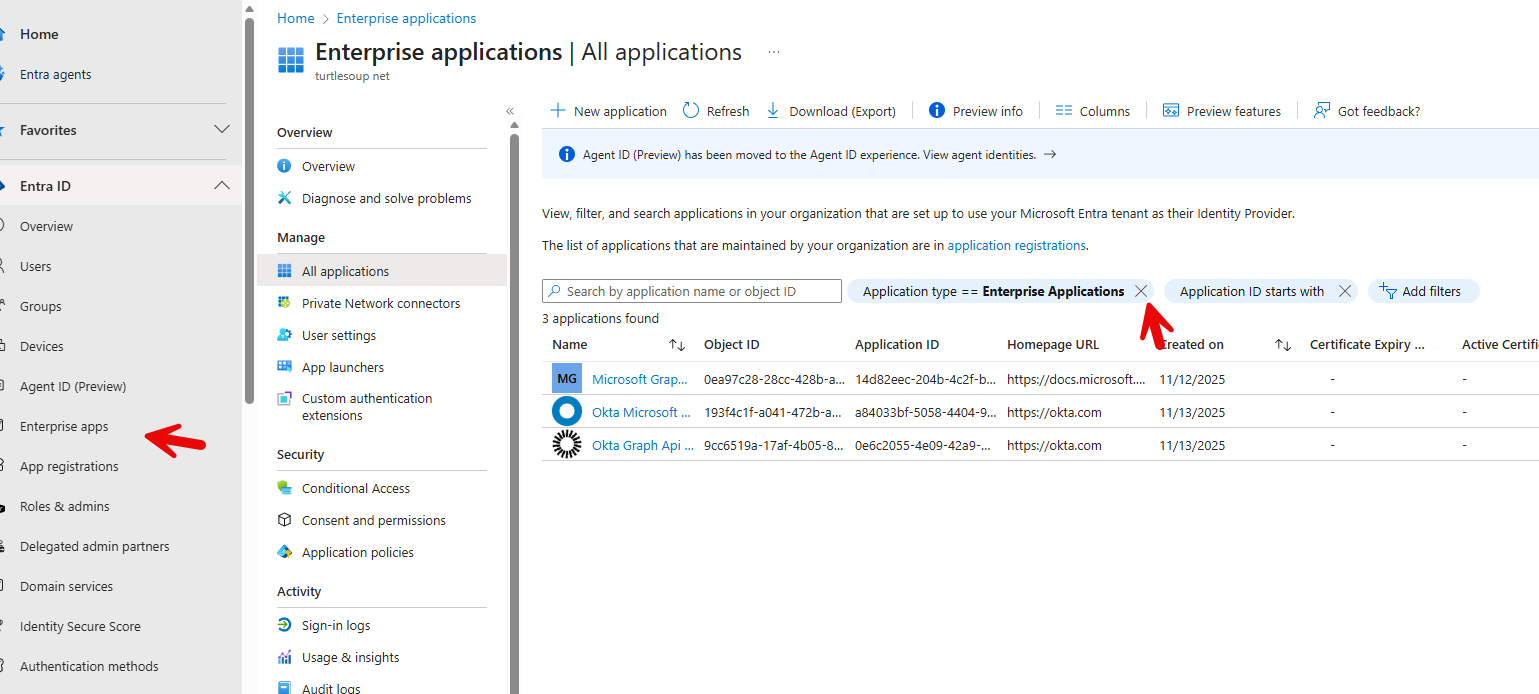
Search for Partner Center Web App.
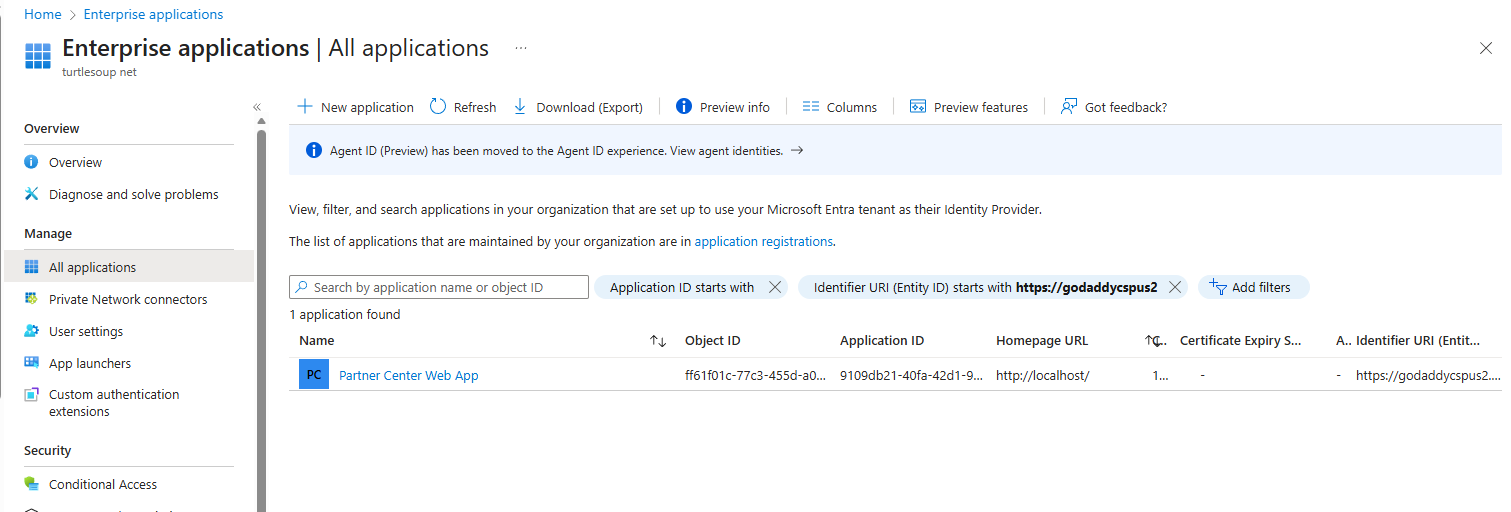
Click on Properties and Delete.
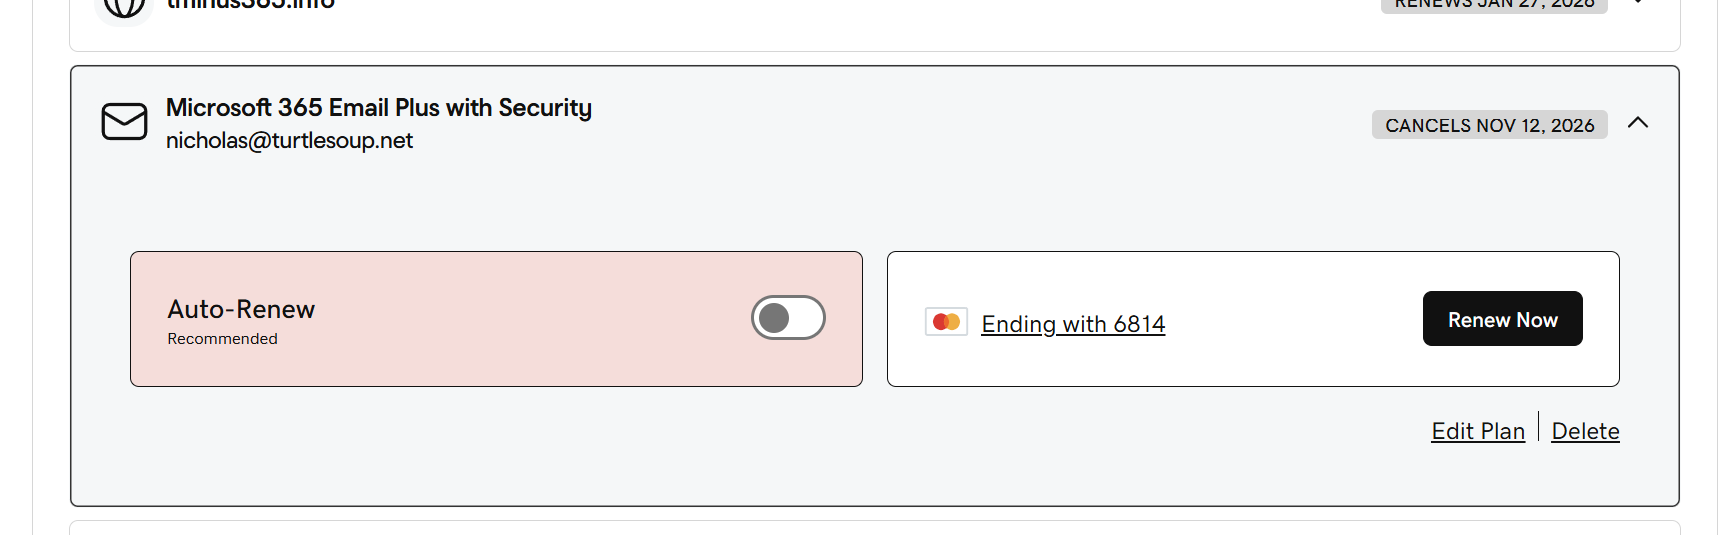
H. Cancel in GoDaddy
In GoDaddy, cancel the renewal: My Account | Billing
Conclusion
From here, the subscription from GoDaddy will expire at end of term and that is all. You now have a tenant under CSP with all of the typical management functionality you are familiar with.
Was this article helpful?
That’s Great!
Thank you for your feedback
Sorry! We couldn't be helpful
Thank you for your feedback
Feedback sent
We appreciate your effort and will try to fix the article